Week 9 - Surveyman
This is my last week at home (India) and the fact that I had a pretty productive week shows that I’m ensconced within the comforts of my home. After the hectic last week which involved traveling, meeting relatives and getting documentation ready for the Visa interview this week was just me sitting at home working on this project without any distractions.
So there were three key features that I tackled this week, namely - TreeView, Option Lists and React transitions. Cumulatively, these changed the UI considerably. The app has finally started to look much more polished.
TreeView
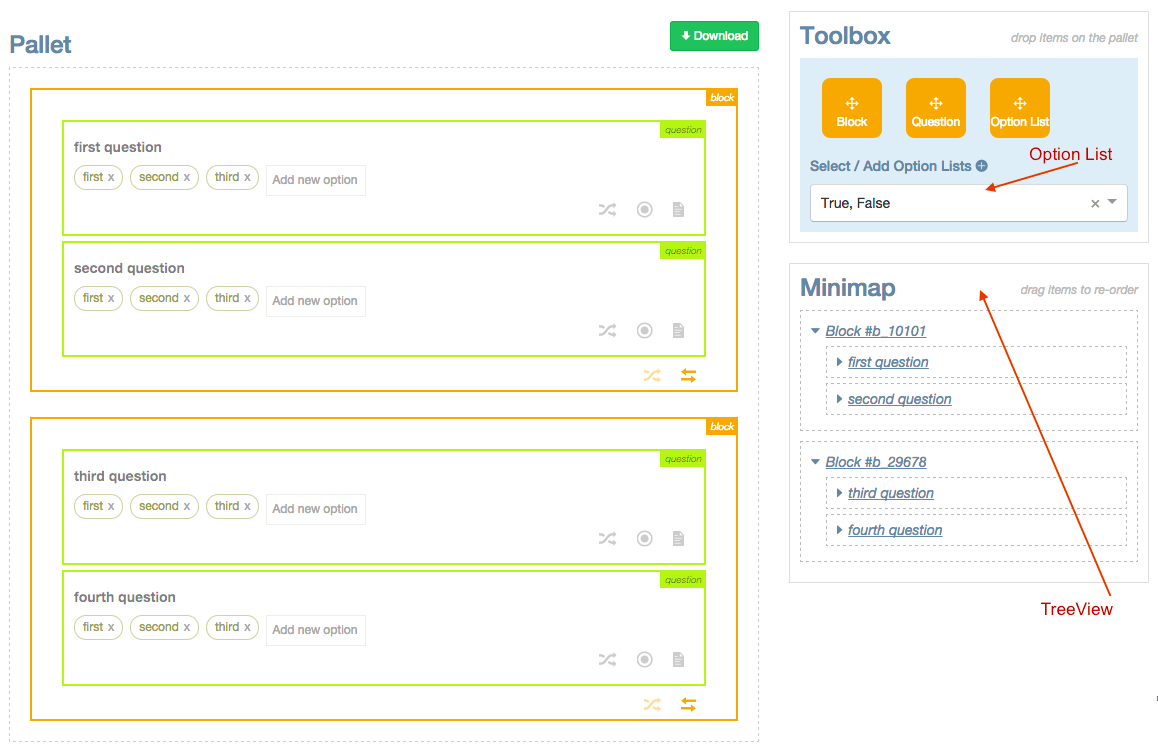
TreeView makes it easy for users to navigate the survey easily. The idea is inspired by Sublime Text’s minimap that allows you to conveniently navigate the file. Having the ability to collapse and expand blocks and questions will be useful in getting a particular item in focus just by clicking on it.
To get started with the feature, I surveyed the landscape to check if there already existing a customizable TreeView component. After checking out a few examples on react.rocks I didn’t find anything that met my requirements so I decided to build my own. More importantly, since the structure of the JSON was simple building a tree view didn’t seem too time consuming.
Before I started writing any code, I read through Cheng Lou’s React Treeview to get an idea of how to approach the problem. So at the end, I just ended up creating two new components - one called TreeNode and another called TreeView. This is how the render function of TreeView looked like.
var TreeView = React.createClass({
  render: function() {
    return (
        <TreeNode key={i}
              label={blockLabel}
              type={ItemTypes.BLOCK}
              handleClick={self.focusOnItem.bind(this, block.get('id'))}>

                 {questions.map((ques, j) => {
                     return (
                         <TreeNode key={j}
                             label={label}
                             type={ItemTypes.QUESTION}
                             handleClick={self.focusOnItem.bind(this, ques.get('id'))} />
                     )})}
        </TreeNode>
      )
    }
  });
To add the additional functionality of bringing the object in focus just required a simple change to window.location like so -
// inside the TreeView component
focusOnItem(id) {
       window.location.hash = id;
}
Option Lists
If you’ve ever built a survey before, you know that most of the questions will end up having the same set of options. For example likert scales are very common, especially in market research surveys. Having to type all the options multiple times can get frustrating and hence providing an easy way to reuse a common set of options would be much better.
That is where OptionLists come in. Options List make it very convenient to re-use an existing set of common options or add your own. In order to use them, you just to drag and drop them on your question.
Technically, option lists were quite simple to build. At the Store I maintain an array of option lists which can later be persisted in LocalStorage. When the user selects an option list from the dropdown I remember that state in the Store. Lastly, when an DraggableOptionList is dropped on a Question I read the index from the Store and add the options to the questions. It’s just that simple.
Transitions
The last improvement that had been on my mind for a while was to add transitions in the application. If you interact with the items for example - try deleting an item you’ll notice that it just disappears out of the survey. The result can feel quite jarring. What I wanted to do was find a way to add subtle animations so that the UI feels much more pleasant.
Unsurprisingly, for transitions I used ReactCSSTransitionGroup which is explained quite clearly in the documentation.
ReactCSSTransitionGroupis based onReactTransitionGroupand is an easy way to perform CSS transitions and animations when a React component enters or leaves the DOM. It’s inspired by the excellent ng-animate library.
Basically, you just wrap your container in ReactCSSTransitionGroup and provide the CSS class that you want to apply on entry and exit of any child component.
<ReactCSSTransitionGroup transitionName="itemTransition" transitionEnter={false}>
    { blocks }
</ReactCSSTransitionGroup>
The best part of building this was when I learnt that there exists a CSS pseudo class called target.
The :target pseudo-class represents the unique element, if any, with an id matching the fragment identifier of the URI of the document.
So you want to animate a subtle effect when the browser focuses on an item? Try this -
:target {
  animation: highlight 1s ease-in;
}
@keyframes highlight {
  0% { background-color: #fcf1bb; }
  100% { background-color: white; }
}
Wicked cool, right?